
Welcome to the Lancaster Pub Maze! The maze starts at Tite & Locke, outside Lancaster railway station. After leaving Tite & Locke, you and your team will sample a selection of Lancaster's finest hostelries, the aim being to get back to Tite & Locke having amassed as few penalty points as possible.
How does it work?
Competitors split into teams of three or four. There are prizes for the best team and for the best individual. At the start of the maze, I will set up a WhatsApp group to communicate with each team, plus a separate "Bingo" group for everyone to play the bingo subgame (and for some inter-team banter). There are eight pubs in the maze, numbered 0-7 as follows:
- Tite & Locke
- The Three Mariners
- The Sun Hotel
- Merchants 1688
- Ye Olde John O'Gaunt
- The Jailor's Barrel
- The Borough Hotel
- The Tap House
At each pub, your team will be given a choice of two destinations. Each destination constitutes another pub (0-7) and a drinks set (red, blue, yellow, purple, orange or green) for that pub. Each set consists of three different drinks: a pint, a wine and a shot.
- Red: cider, red wine and tequila.
- Blue: stout, white wine and whisky.
- Yellow: belgian ale (e.g. lambic), sparkling wine and rum.
- Purple: pale ale, port and vodka.
- Orange: lager, sherry and gin.
- Green: bitter, vermouth (e.g. Martini) and brandy.
Having reached the next pub, the team must choose a team drink from the appropriate set. The drink chosen must be the same for all players in the team, and must, if possible, have not been chosen before by the team. Each competitor must consume the designated drink or concede an individual penalty point; at least two team members must consume the designated drink to avoid a team penalty point. Play continues in this fashion until the team either exits the maze, by finding the route back to Tite & Locke, or they reach the maximum move count of 24, at which point they are disqualified. There's no real time limit, other than Tite & Locke shutting at 10pm, so you'll need to be done before then.
Notes:
- Please take a team picture in each pub as proof that you have bought the correct drinks.
- The final drink in Tite & Locke (to complete the maze) is a free choice from any of the six sets. Each team member may choose their own drink independently here. This drink cannot be used to claim a bingo prize (see below).
- It is only necessary to visit a pub if your team does not want to concede penalty points. If you wish, you can simply accept a penalty, marking it as such on the scoresheet (see below), and progressing to the next pub in sequence. It is better to complete the maze on paper, even if this results in a high number of penalties, than not at all. It is likely that all teams will accumulate penalties at some point in their day; you only have to accumulate fewer penalty points than the other teams to win!
- If it so happens that a pub isn't serving a particular drink, then it is permissible to have an alternative drink from the same set, but still claim it as if it were the unavailable drink for purposes of the official scorecard. If this happens, then let me know – I will be checking up to make sure there is no funny business going on.
- A beer race will decide the title in the event of a tie!
The Maze
There are three routes into the maze from Tite & Locke: you can go for a blue drink at the Three Mariners; or an orange drink at The Borough Hotel; or a red drink at the Tap House. In shorthand: 1b, 6o and 7r. This is conveniently represented by the following diagram:

You start the day at the black 0 (Tite & Locke) in the centre of the maze. You finish the maze when you reach another black 0. Let's say that you choose to go to 1b. Your team heads over to the Three Mariners and opts for a pint of stout. The team's next move can be found by looking for the number 1 in the blue section of the maze. This will give two more possible destinations, indicated by the arrows. The observant amongst you may have noticed that these are currently question marks. Never fear – once you've made your move (by notifying me) the map will be updated to reveal all the destinations associated with the colour in question. For example, on visiting 1b, the entire blue section of the maze (one sixth of the total) will be revealed. The entire maze will be revealed once you've visited a destination of each colour. Then, all that remains is to escape!
Notes:
- I'll send you a secret codeword once you've notified me of your move. To see the next part of the map, simply append the codeword to the end of this url (with a forward slash in between). For instance, if the codeword were weasel, then you'd enter www.webmazes.net/lancasterPubMaze/weasel as the url. You'll be presented with a sarcastic message if you enter the codeword incorrectly.
- There is also a blank map of the maze on the back of your scoresheet. If you prefer to view the maze on paper, rather than on a screen, then you can simply transcribe the map to your individual paper copy as it is revealed.
- I can also send the map information to you in text form, if you don't have internet access on your phone.
Bingo bonuses
Bonuses are available that can reduce the number of penalties accrued by each competitor or team. These are awarded on a first-come-first-served basis (based on move count, not time). There are two separate bingo competitions: one for individual competitors and one for teams. If there are two or more claimants to a bingo prize with the same move count, each gets the full points. The prizes can only be claimed by an individual or team that has successfully completed a legal move (i.e. no penalty was incurred) in which the drink in question was the designated drink. The bingo prizes are:
- Three of the same colour: drinking all three drinks in a set allows you to deduct 1 penalty point at the end of the maze.
- Six of the same type: drinking all six drinks of the same type (e.g. all six wines) allows you to deduct 2 penalty points at the end of the maze.
- Full House: drinking all eighteen drinks allows you to deduct 6 penalty points at the end of the game. This prize can be claimed in addition to any of the other prizes (i.e. you deduct 6 penalty points in addition to any other bingo bonuses already claimed).
Players and teams can keep track of the drinks consumed, and the bonuses claimed, on their scorecards (see below). It is possible to collect more bonuses than penalty points; this will result in a negative final score.
Secret objectives
At the start of the maze, I'll give each competitor their own secret objective (randomly allocated), which they should keep hidden from their teammates. This will initially be in the form of a codeword, which can be entered as a url to reveal details of the covert assignment. For instance, if the codeword were stoat, one would enter www.webmazes.net/lancasterPubMaze/stoat as the url. I can also send you your secret objective in text form if you are not able to access the internet.
Should a competitor complete their secret objective and wish to claim their prize (it's entirely optional), then the following effect is triggered:
- The competitor who completes their secret objective becomes happy. Happy players can deduct 3 penalty points at the end of the maze.
- All teammates of the happy player (unless they are already happy or sad themselves) must drink a shot (minimum 25% ABV) of the happy player's choosing, at the earliest opportunity. A teammate who refuses to drink the shot becomes sad. Once a player becomes sad, all subsequent penalties are doubled!
A happy player cannot subsequently become sad and a sad player cannot subsequently become happy. This means that a sad player's secret objective is immediately discarded – it cannot legally be completed.
A team is happy if two or more of its members are happy; similarly, a team is sad if two or more of its members are sad. The same effects apply as in the individual case (happy teams can deduct 3 penalty points; sad teams have their future penalty points doubled). Unlike an individual, it is possible for a team to be both happy and sad at the same time – bittersweet.
Individual scoring
Each competitor keeps track of their progress via the following scorecard:
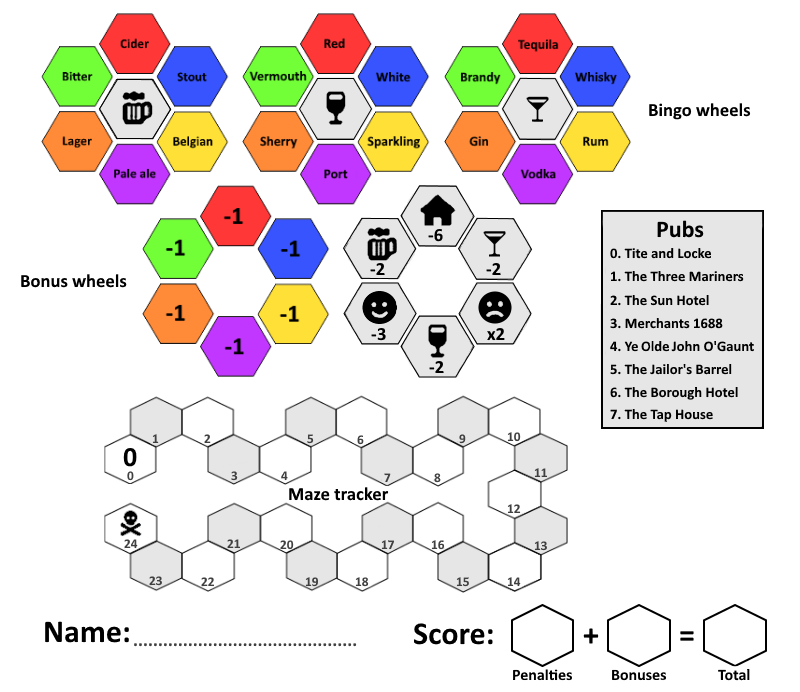
Moves are entered in the maze tracker near the bottom of the card (move 0 has already been filled in for you), by writing the pub number, the first letter of the colour and whether you've opted for a pint (abbreviated as P), a wine (abbreviated as W) or a shot (abbreviated as S). An example move would be 5gW, meaning "a wine from the green set in pub five" or, in plain English, "a vermouth in the Jailor's Barrel". The move will be exactly the same for all the players in the team.
Once you've written down the move you should strike it out again (with a single line) if you failed to down the appropriate drink (or a double line if you are sad). This means that you've incurred a penalty point (or two, if sad). If, on the other hand, you do finish the drink, then you can instead cross it off the bingo card section at the top of the card (in the top row of three bingo wheels).
If you manage to complete a set, then you can claim a bingo prize by contacting me via the "bingo" WhatsApp group (say something like "Alice: red set in seven moves", "Bob: six wines in ten moves" or "Team 2: house in twenty moves"). I'll let you know, in due course, if your claim has been successful (it's based on move count, so other claimants might beat you to it or share the prize). If it has, then you can circle (or otherwise mark off) the corresponding cell of the two central bonus wheels. As a general rule, I'll try to keep all the teams updated as soon as a bingo prize has been allocated, so that people know which prizes are still in play.
The happy/sad bonuses can also be marked off in the final (grey) wheel. Please let me know, via the team's WhatsApp group, so I can also keep track of this.
If you reach the skull and crossbones in cell 24 of the maze tracker, then you're disqualified and are out of the game. Sorry.
Once the maze is complete, a player's final individual score is calculated as the number of penalties on the maze tracker combined with the bonuses collected.
Team scoring
The team scorecard is pretty much the same as the individual one. The main difference is that a team pass requires two or more team members to finish the designated drink. That is, a team penalty point is incurred if fewer than two team members finish their drink. Drinks can be crossed off the bingo wheels if the team did not accrue a penalty for the move.
Bingo prizes are claimed in the same way as in the individual competition, but on a per team basis.
The happy bonus is awarded if two or more of the team members are happy; the sad 'bonus' is awarded if two or more of the team members are sad.
At the conclusion of the maze, the team's final score is computed in the same way as an individual's: penalties + bonuses.
Example scorecard
Here's an example walkthrough, starring Alice, of Webmazes 'fame'.
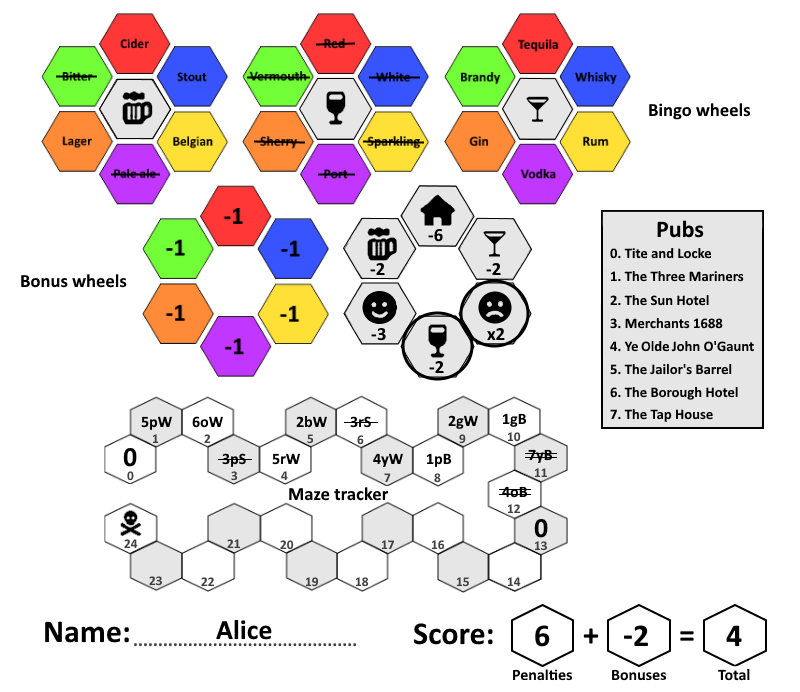
For this maze, Alice decided to concentrate on bagging the wine bingo bonus. She starts with a port in the Jailor's barrel, quickly followed by a sherry in the Borough Hotel. After that she's back on purple in Merchants 1688. She can't have another port, so instead opts for vodka. She wants to save room for more wine, so decides to take a +1 penalty instead. Finding herself back at the Jailor's Barrel, she necks a red wine, swiftly followed by a white wine in the Sun Hotel. On move 6, the team move back to Merchants 1688 and she opts to take her tequila on paper only, scooping up another +1 penalty point. A glass of Prosecco in Ye Olde John O'Gaunt follows, before deciding she's taken enough penalties and plumping for a pint of pale ale in the Three Mariners. At last, on move 9, the team move back to the Sun Hotel and she gets the chance to bag the wine set bonus. Thankfully, no one else has claimed this yet, so she picks up a juicy -2 bonus! On move 10 she's back in the Three Mariners for a pint of bitter. At this stage, one of her team mates, Bob, completes his secret objective and orders her a shot of Pernod, which she can't keep down. That means shes now officially sad, so she circles the corresponding cell of the bonus wheel – that's a x2 modifier to all subsequent penalties. At this point, the team decide that they can't take any more alcohol, but they have worked out the route through the maze. They decide to head straight back to Tite & Locke, completing the rest of the maze on paper only (missing out the Tap House and Ye Olde John O'Gaunt). This takes two more moves, so that's +4 penalty points (i.e. +2 doubled because Alice is sad). Finally, back at Tite & Locke she decides she's earned a final glass of champagne to round off the day (and prevent a further brace of penalty points), her final score being a grand total of +4 penalty points.